Update: We now have a full masterclass on NoSQL migration. You can watch it (free + on-demand) here: NoSQL Data Migration Masterclass.
ScyllaDB’s webinar on Spark, File Transfer and More: Strategies for Migrating Data to and from a Cassandra or ScyllaDB Cluster drew broad interest and will likely remain a popular topic for years to come. So, you’ve decided to adopt ScyllaDB (or Cassandra). What’s the best way to get your Big Data uploaded into your new cluster? What ScyllaDB or Cassandra data migration strategies, tools and techniques can you use to get your terabytes or petabytes from point A to point B?
Those were the questions of the day for Dan Yasny, Field Engineer of ScyllaDB. Being a Field Engineer means Dan gets to touch every aspect of work our customers undertake, from initial prototyping on proof-of-concept (POC) deployments, to ensuring operational excellence for production systems. Data migration is an issue that has to be solved for everyone, whether they are running a traditional Cassandra database, ScyllaDB Open Source NoSQL Database, ScyllaDB Enterprise, or the new ScyllaDB Cloud (NoSQL DBaaS).
The webinar set forth to cover all the main data migration use cases, both online (those updates without downtime or outages) and offline (where downtime is permitted), to work through a number of strategies for each, and to talk about common data migration problems , such as schema modifications and data validation. While everyone wants to do online migrations, it is not always possible given the additional complexity and operational realities like load. Offline migration is the easier and more straightforward case.
Offline / Cold Migration
Again, “offline” or “cold migration” occurs when you are able to take down the production system. This avoids, amongst other issues, having to manage dual writes. Dan broke the process into a few steps.
- Migrating schema
- Forklifting existing data (to get the databases in sync)
- Validation
- Then cut-over; fading off the old to the new system
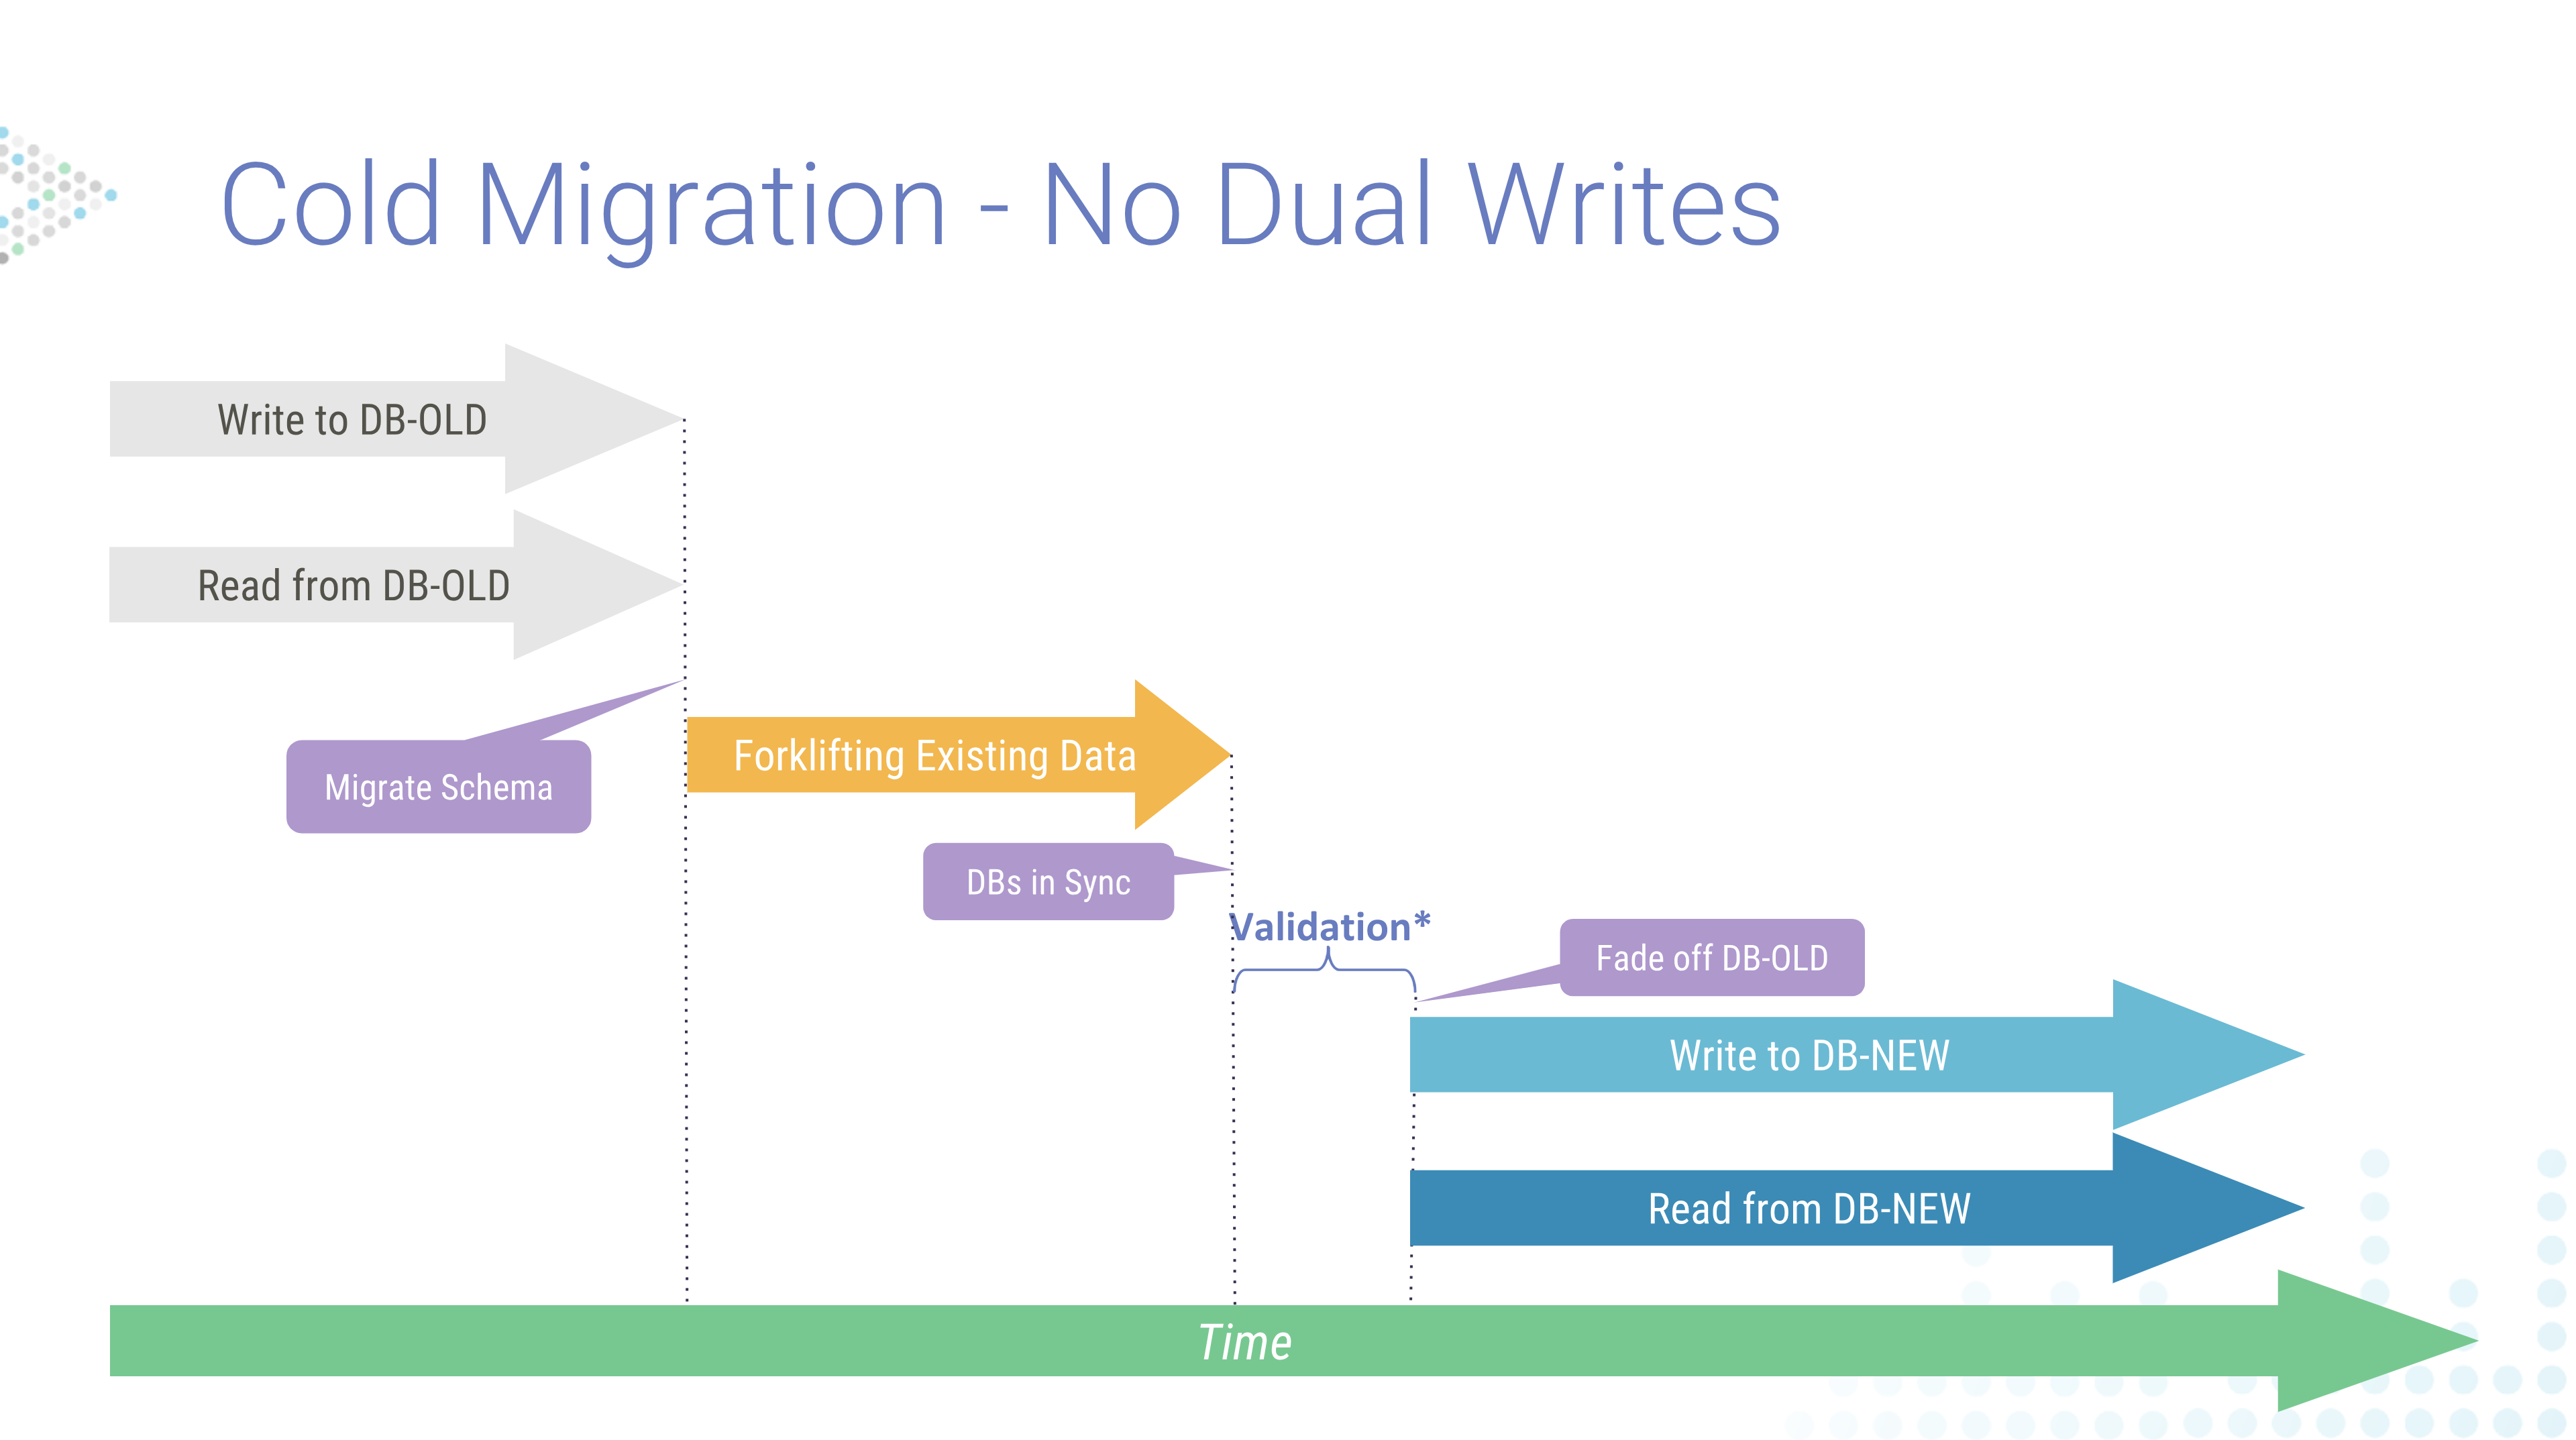
This sequence of actions for cold migration happens top-to-bottom. Schema migration occurs first. Then data synchronization. Following that you will validate the data and fade off (decommission) the original database.
To migrate schema, when talking only about ScyllaDB and Cassandra, there is a CQL shell command DESCRIBE to simply dump the schema into a file, then load it into the destination database:
- Use
DESCRIBEto export each Cassandra Keyspace, Table, UDT
cqlsh [IP] "-e DESC SCHEMA" > orig_schema.cql
cqlsh [IP] --file 'adjusted_schema.cql'
While that seems straightforward, you might need to also adjust it for specific versions or features of ScyllaDB and Cassandra, since some of the syntax may differ. Dan also suggested reading our full documentation for the Apache Cassandra to ScyllaDB migration process.
After migrating the schema, this is where the incurred downtime begins, so that you can transfer data to the new system and get both in sync. You would, of course, need to run some sort of validation tests. At that point you could decommission the old system and go-live with the new database. This is when your downtime window ends.
While this is straightforward, the large chunk of downtime would need to be managed. That very idea also seems to be contrary to the foundational precepts of systems like ScyllaDB or Cassandra which bills themselves as “highly available.” As Dan said, “If you’re in production you probably don’t want to do that. So from here on out, we’ll be mostly talking about online migrations without downtime.”
Online Migration
The primary requirement for online migration entails dual writes after you migrate the schema to the new system. “Whatever client you have writing to your old database will start writing into the new one as well.” After enabling dual writes you then have to migrate all the existing data from the old system.
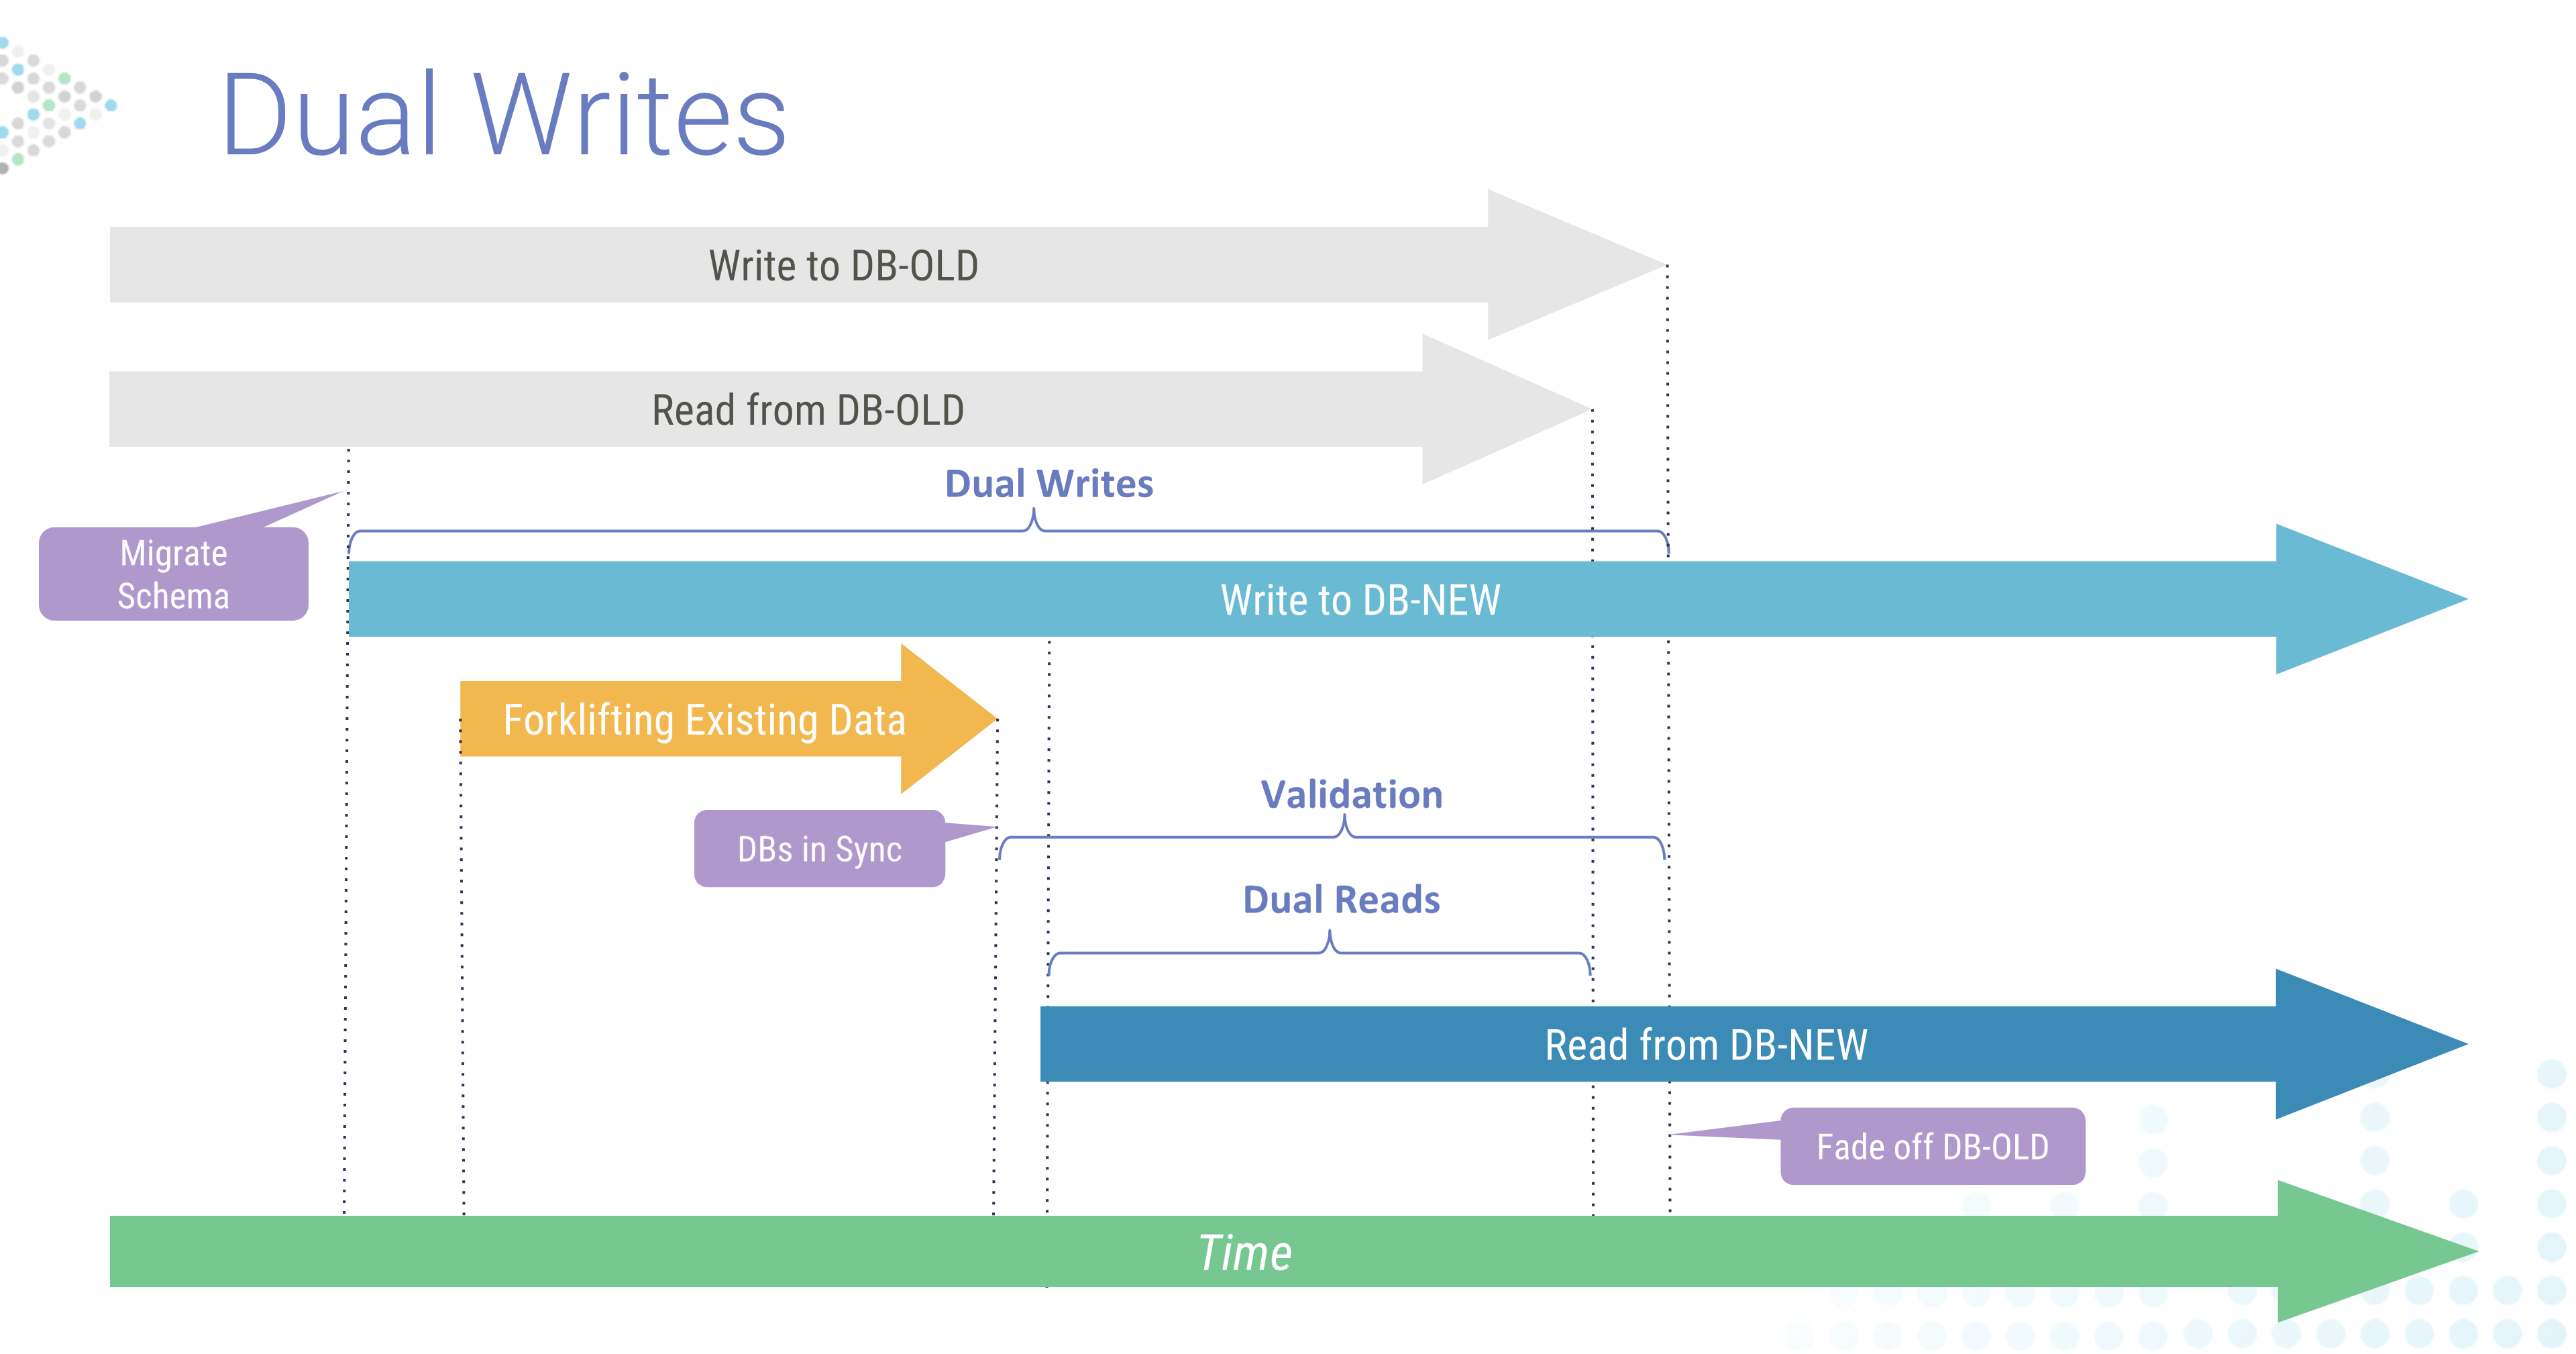
This sequence diagram is read top-to-bottom. As in the offline example, you begin by migrating the schema, but notice that you do not end reads or writes to the old database yet. You will then load the data in the new system, keeping both in synch as you validate the new system. Then you will cut over reads to the new system before decommissioning the old one.
Both systems are in operation at this time. The production system is responding to live queries and updates. The new system, once synced, is then validated. For instance, you can do dual reads to compare results to ensure you had consistency across both systems. After that, you can begin to fade off the original system, changing reads to be solely from the new system. Eventually you would stop writes to the old system and have it decommissioned.
Data Migration Using Kafka
While this is the general idea, the question remains how precisely should you do this. Dan began by suggesting Apache Kafka. Not that you’d implement Kafka solely just to migrate your data, but that if you already had Kafka installed and working to stream data to and from the old database you could leverage it for this process.
Begin your data migration using Kafka by buffering the writes to the new cluster. Increase the Time-to-Live (TTL) and add buffer time just before you are about to start, and throughout the migration process. Once the migration is complete, you can stream the buffered data to the new system. You can accomplish this with the Kafka connect framework, using the Cassandra connector (which works for both Cassandra and ScyllaDB implementations). If you want to make some changes to the data, Dan also suggested looking at the experimental KSQL feature. (See the presentation made by Confluent’s Hojjat Jafarpour at ScyllaDB Summit for more on KSQL, Kafka and ScyllaDB.)
This is not precisely a classical “dual writes” set up, as Dan points out, because Kafka will be storing the writes until the new system comes online, then streaming the updates. This is more like an SQL log replay. But you will essentially achieve the same result.
In case you did not wish to use Kafka, Dan shared a python example for how to add the second writes.
writes = []
    writes.append(db1.execute_async(insert_statement_prepared[0], values))
    writes.append(db2.execute_async(insert_statement_prepared[1], values))

    results = []
    for i in range(0,len(writes)):
        try: row = writes[i].result()
        results.append(1)
    except Exception:
        results.append(0)
        # Handle it

    if (results[0]==0):
        log('Write to cluster 1 failed')
    if (results[1]==0):
        log('Write to cluster 2 failed')
Writes are pushed in this example to the original database, db1. You simply append the second write to db2. “It does the exact same insert and pushes it to the second database, and then also validates that it didn’t fail.” Of course, as Dan points out, different languages will have different syntax, and you may have to add complexity to it, but this is all that is needed to achieve dual writes.
Existing Data Migration
The bulk of the webinar then shifted to migration of existing data. The main strategies include:
- CQL COPY — This method is useful for arbitrary files to get loaded up into ScyllaDB. It works for both CQL-compatible and CQL-incompatible databases.
- SSTableloader — sstableloader is a bulk loader useful for databases which are Cassandra SSTable-compatible, including Cassandra and ScyllaDB. This is the format of the data stored on disk. (CosmosDB, for example, is CQL compatible, but not SSTable-compatible.) Takes an SSTable file and serves it to the new database over CQL. This may allow you to mitigate different versions of SSTables between systems.
- Mirror loader — This method requires SSTables between databases to be of the exact same supported format. For example, ScyllaDB supports ka, la, mc formats. The SSTables are mirrored from the old system to the new system, without touching them via CQL.
- Spark Migrator — The “star of the show,” as Dan describes, using Apache Spark as an intermediary for migration.
Yet regardless of the data migration strategy utilized, Dan had a critical piece of advice: “When performing an online migration, always use a strategy that preserves timestamps, unless all keys are unique. Because if you are writing new data that’s coming in from the dual-write system into your database it will come in with a specific, current timestamp. If at the same time you are loading old historical data and the same data happens to be writing into the same key in the destination database, some of the strategies will actually write it with the current timestamp instead of the original one. And that means you might be overwriting the new data with old data.” So we want to avoid that.
Low TTLs?
Let the old database expire Before getting into the main methods, Dan brought up an interesting corner case. What if you have a highly-volatile system where all the data has a short Time-to-Live (TTL)? You could set up your new system to synch, and then simply let the old database’s data expire. Once all the old system’s data has expired, you can then decommission it safely and run from the new database. This method should work for ScyllaDB, ScyllaDB Cloud, Cassandra, or, in fact, any other NoSQL or even SQL database if you set up the dual writes correctly.
CQL Copy Method

This method works for both CQL-compatible and CQL-incompatible database. When bringing data in from CQL-compatible databases, it is pretty much the same schema, which can be migrated. When bringing in data from CQL-incompatible databases, you have to redesign your schema to work in the new database. When bringing in data this way, you are basically uploading Comma-Separated Value (CSV) files into your destination database.
“Since you are reading files, the size matters,” Dan emphasized. “The larger the file, the longer it takes and the harder it is for the client to parse it.”
One way to shorten the process is to consider if you want to move all your columns of data into your destination. You might not need to take them all. As usual for any Extract, Transform and Load (ETL) processing, data formatting is critical. How you wish to represent your NULLs, your DATETIMEs, quotes, escape characters, and delimiters. Dan recognized that “CSV” is often used as a shorthand for any character-delimited file. You might instead, for example, separate values with pipes (the vertical bar character “|”).
The best practice here would be to have smaller files and to run your COPY process from a separate host. If you run it on the same box as where you are running ScyllaDB, for instance, you would be competing for resources. (Also, not mentioned in the webinar, here’s a pro-tip from the ScyllaDB documentation: The performance of cqlsh’s COPY operations can be improved by installing cython. This will compile the python modules that are central to the performance of COPY.)
Dan then pointed out how the COPY command has a number of “knobs you can tweak to improve the performance of the ingestion.” These include:
- HEADER
- CHUNKSIZE
- DATETIMEFORMAT
- DELIMITER
- INGESTRATE
- MAXBATCHSIZE
- MAXROWS
- NULL
- PREPAREDSTATEMENTS
- TTL
“For example,” Dan points out, “the INGESTRATE and MAXBATCHSIZE are good to be set, because this is how you can actually throttle the command and make sure it doesn’t overwhelm your loader server,” and to ensure the loading doesn’t just break in the middle of the process.
Every process has its advantages and disadvantages, and Dan made sure to point these out. For example, while COPY is good because of its simplicity. Having data in CSV (or other delimited) format makes inspection of your data transparent; you are basically looking at a text file. You can parse it with Python Pandas, for example. They are easy to manipulate and validate. You can change the schema on the fly. So it can be used for any sort of data ingestion. You can dump data from PostrgreSQL into CSV, and then upload it directly into ScyllaDB, ScyllaDB Cloud or Cassandra. Yet it is not scalable to large data sizes. You may have to break the data into a large amount of small files (gigabytes not petabytes). Also, users should be careful since this method does not preserve timestamps.
SSTableloader

Dan then turned to consider the SSTableloader option. This reads the table files of the source database from disk; it doesn’t connect to the original database itself. This utility snapshots the contents of a node and loads that static immutable data into the destination database using CQL. It is often helpful to set up intermediate nodes to run the loader to avoid increasing load on the original or destination clusters. You should run several sstableloader nodes in parallel. This method is only useful if you have disk access to the original SSTable files. So you could, for example, copy the snapshotted files to the loader hosts, or through exporting directories via an NFS mount, which you can then mount on the loaders. And, of course, it only works for SSTable disk-format compatible databases.

Apache Cassandra and ScyllaDB, which both ship with their own SSTableloader utility. While similar, there exist some subtle differences. That is why we recommend using the ScyllaDB sstableloader to migrate information into ScyllaDB. For example, the Apache Cassandra SSTableloader cannot make schema changes, whereas ScyllaDB’s SSTableloader can rename columns.
There is also some data bloat on the system until compactions occur, so you may need to have extra disk space just for the initial loading.
Dan pointed out ScyllaDB documentation for failure handling with SSTableloader. This is to answer the most common issues that can occur: what if the sstableloader fails? Or just a source node? Or a destination node? Can you rollback and start from scratch?
Mirror Loader
Dan then proceeded to the mirror loader, “An interesting way for us to move data around.” In particular, this method is preferable “if you don’t want to move too much across the wire as well as if you maybe need to decommission your original cluster in a hurry.”
To implement this method, you will build the same database that you already have in a temporary copy; a mirror or clone of its files. In this example, you have six Cassandra nodes that will be copied to a new temporary ScyllaDB cluster, using nodes more-or-less the same size. The nodes are paired, with sister nodes on the original cluster and in the temporary cluster.
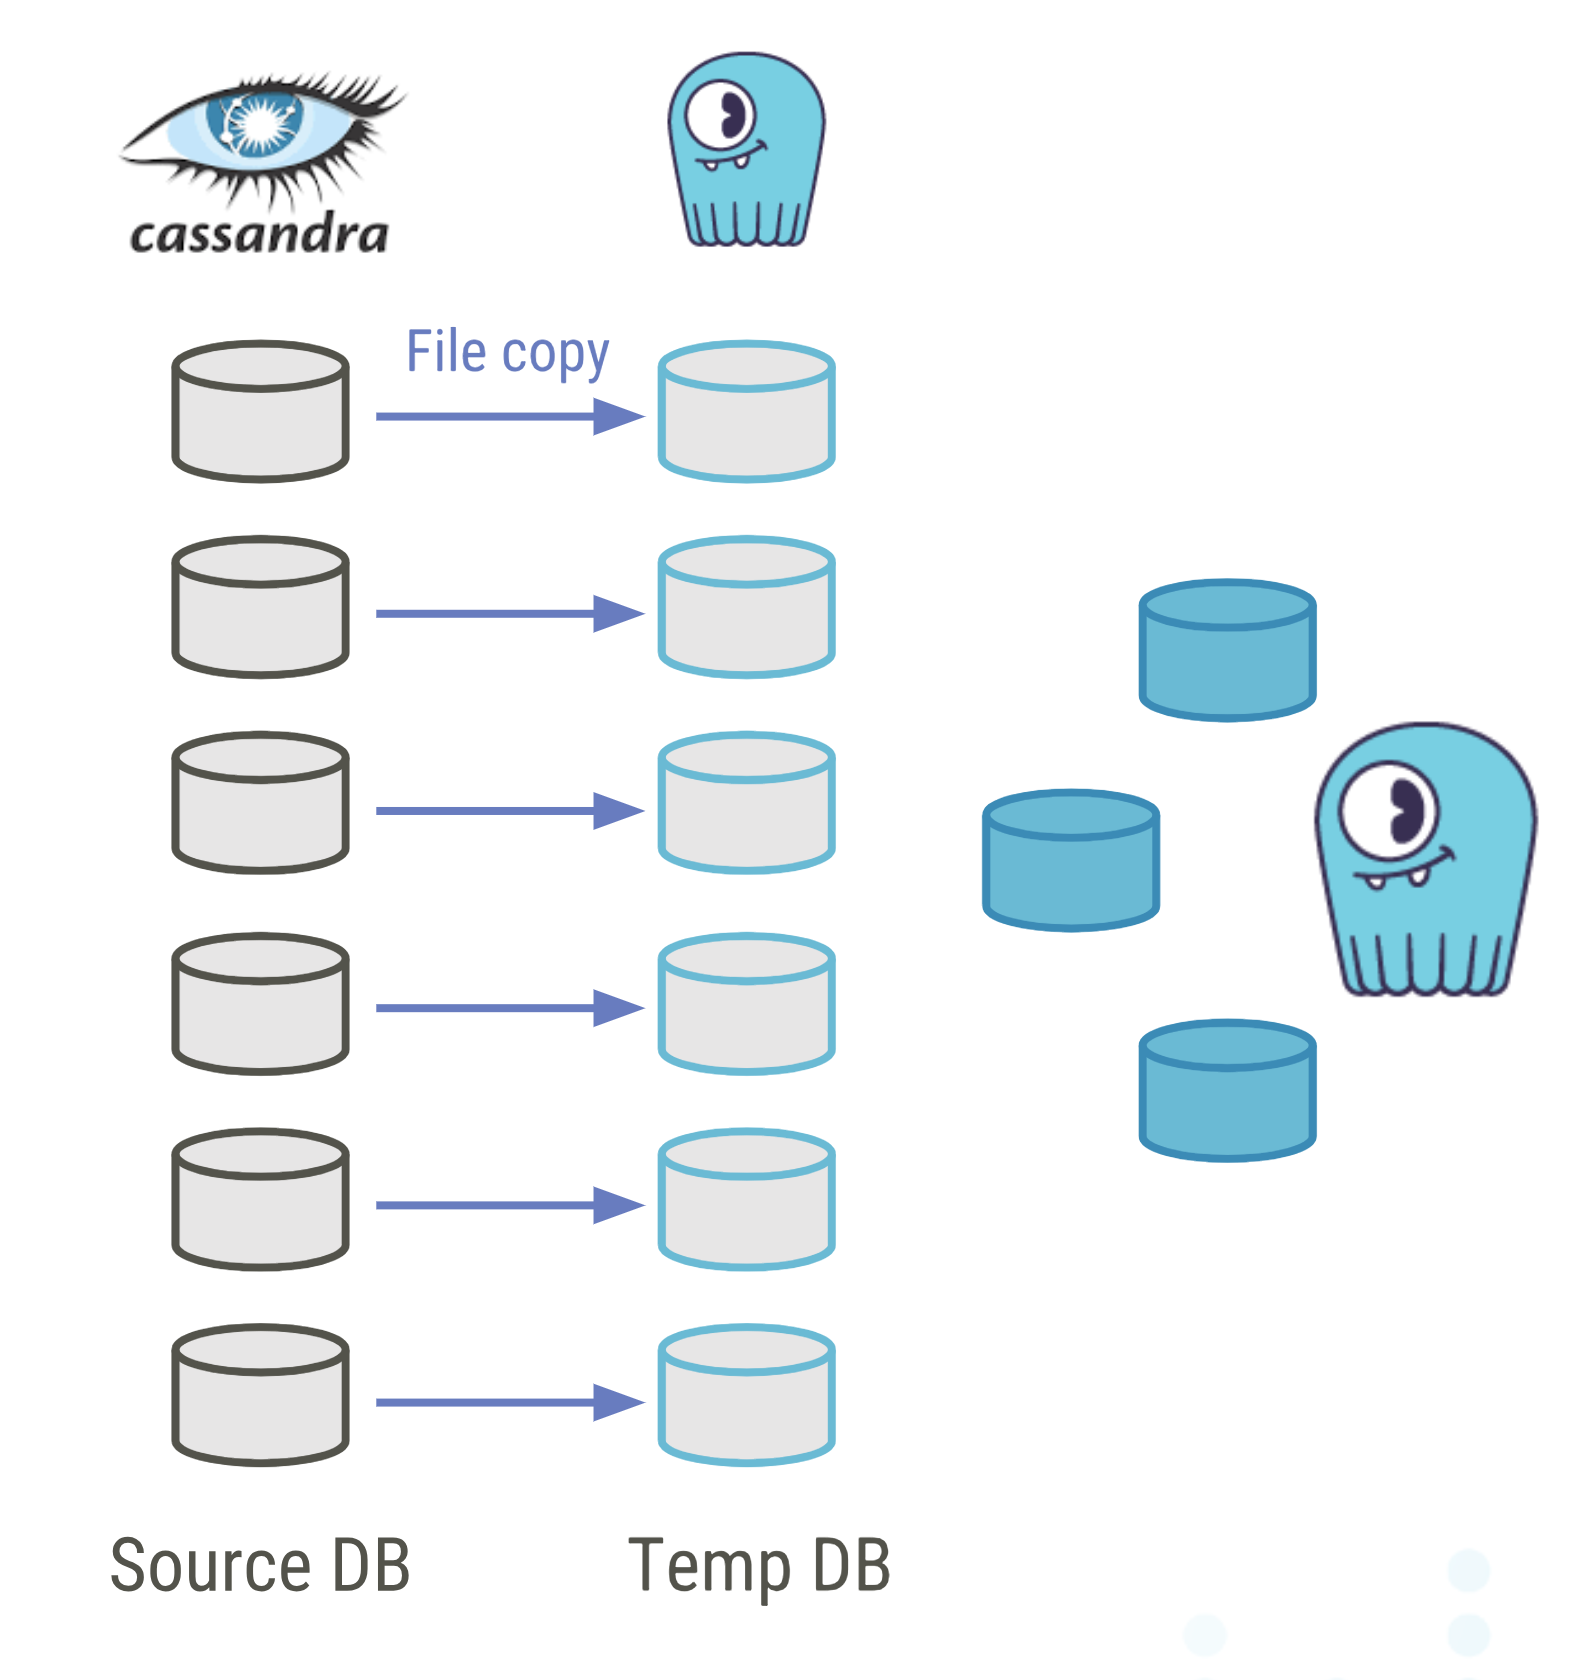
Every node on the new temporary ring has to have the same token ranges as the original nodes. So use the nodetool ring command to make sure you get the token ranges assigned to each node. Once you have the data in the temporary database, you can decommission the original cluster.
Once you are only working with the mirrored cluster, you can build the actual destination cluster. These may be different sized nodes than the original — larger instances for example — to minimize your administrative overhead. This will be a different logical datacenter in the same ScyllaDB cluster as the temporary set of nodes. (It doesn’t need to be a geographically different datacenter, however.) You use the temporary nodes as a seed and start synchronization using a nodetool repair or rebuild. This streaming then relies on ScyllaDB’s internal protocols (which you can read more about here). You wait for the synchronization to complete, and then you can decommission the temporary cluster (and, if you haven’t done so already, the original cluster).
Note that the temporary cluster is entirely production-ready from the moments are done copying, so the original database can be taken offline immediately after data validation.

This ScyllaDB or Cassandra data migration approach is very simple. Aside from ensuring that you’ve cloned the tokens properly, this is a direct file copy. Use rsync or scp or whatever you prefer. There is no data ingestion in the temporary cluster. This has very little impact on the original production database, since you won’t be touching its APIs or putting load on it apart for some disk I/O and some network I/O. If you have a separate NIC just for the migration, then not even that. The final migration, using internal ScyllaDB streaming methods, is then very fast.
The downside is that this requires databases to share the same Cassandra-compatible SSTable data formats (ka, la and mc). There are other SSTable formats, but these are the ones ScyllaDB supports. Also, you need a temporary cluster as big as your original cluster. So if you had a 1,200 node Cassandra cluster, you’d need a temporary ScyllaDB cluster of the same size. Plus, you still might want or need to adjust your schema.
Also, this method only works where you have access to the file systems and have control of the node topology, so it would not be appropriate for a managed system such as ScyllaDB Cloud.
ScyllaDB Spark Migrator

“Well let’s talk about the ScyllaDB Spark Migrator, which is literally the star of the show here,” Dan continued. (You can find the Github repo for it here.) The ScyllaDB Spark Migrator connects to the CQL connectors for ScyllaDB, ScyllaDB Cloud and Cassandra. It does not work for other NoSQL or SQL databases that are not CQL-compatible.
“The method itself means we start multiple Spark workers, and they will be connecting to both the source and destination databases. Reading data from the source, and writing data into the destination natively.”
This method is very resilient to failure. “It will store save points, and it will retry reads and writes if a chunk of the workload failed.” Which is useful to continuing to transfer data if the job failed in the middle. It does this by storing save point files on the disk where the Spark master is running. It can also redistribute load between the workers. The streaming power is limited only by the bandwidth and hardware you have available.
Another advantage for data transfer is that you only need to copy the data once. The source and destination systems take care of replication factors on disk. As well, this method can be configured to preserve the WRITETIME and TTL attributes of the fields that are copied, which means you don’t need to worry about overwriting new data with older, historical data. And, as well, you can allow schema change by letting the ScyllaDB Spark Migrator handle column renames as part of the transfer.
If you haven’t used Apache Spark before, it might seem a bit intimidating, but Dan assured webinar viewers it was a very simple and easy-to-use tool. You install the standard Spark stack (including any requisite Java JRE and JDK, and a build tool like SBT). Start the Spark master and workers, all of which is well-documented. Edit your configuration files and run. If you already have a Spark cluster running, it will probably be even easier for you.
Dan then walked through the configuration, showing how to specify the source host IP address, port, basic authentication credentials, the keyspace and table. You can also set other attributes (split counts, number of connections for workers, and the fetch size). Similar configuration to the source is then established for the target (destination) cluster. Plus you can specify whether you wish to preserve timestamps, and what your interval is for establishing savepoints (in seconds). You can also specify column renames and if you wish to skip any token ranges.
source:
  host: 10.0.0.110
  port: 9042
  credentials:
    username: <user>
    password: <pass>
  keyspace: keyspace1
  table: standard1
  splitCount: 256
  connections: 4
  fetchSize: 1000
target:
...
preserveTimestamps: true
savepoints:
  path: /tmp/savepoints
  intervalSeconds: 60
renames: []
skipTokenRanges: []
You then run the Migrator and wait for it to finish.
Dan then showed what it looks like when it runs. First some standard output (stdout) above. Dan commented, “You will notice it is very chatty.”
2019-03-25 20:30:04 INFO  migrator:405 -
Created a savepoint config at
/tmp/savepoints/savepoint_1553545804.yaml
due to schedule. Ranges added:
Set((49660176753484882,50517483720003777),
(1176795029308651734,1264410883115973030),
(-246387809075769230,-238284145977950153),
(-735372055852897323,-726956712682417148),
(6875465462741850487,6973045836764204908),
(-467003452415310709,-4589291437737669003)
...
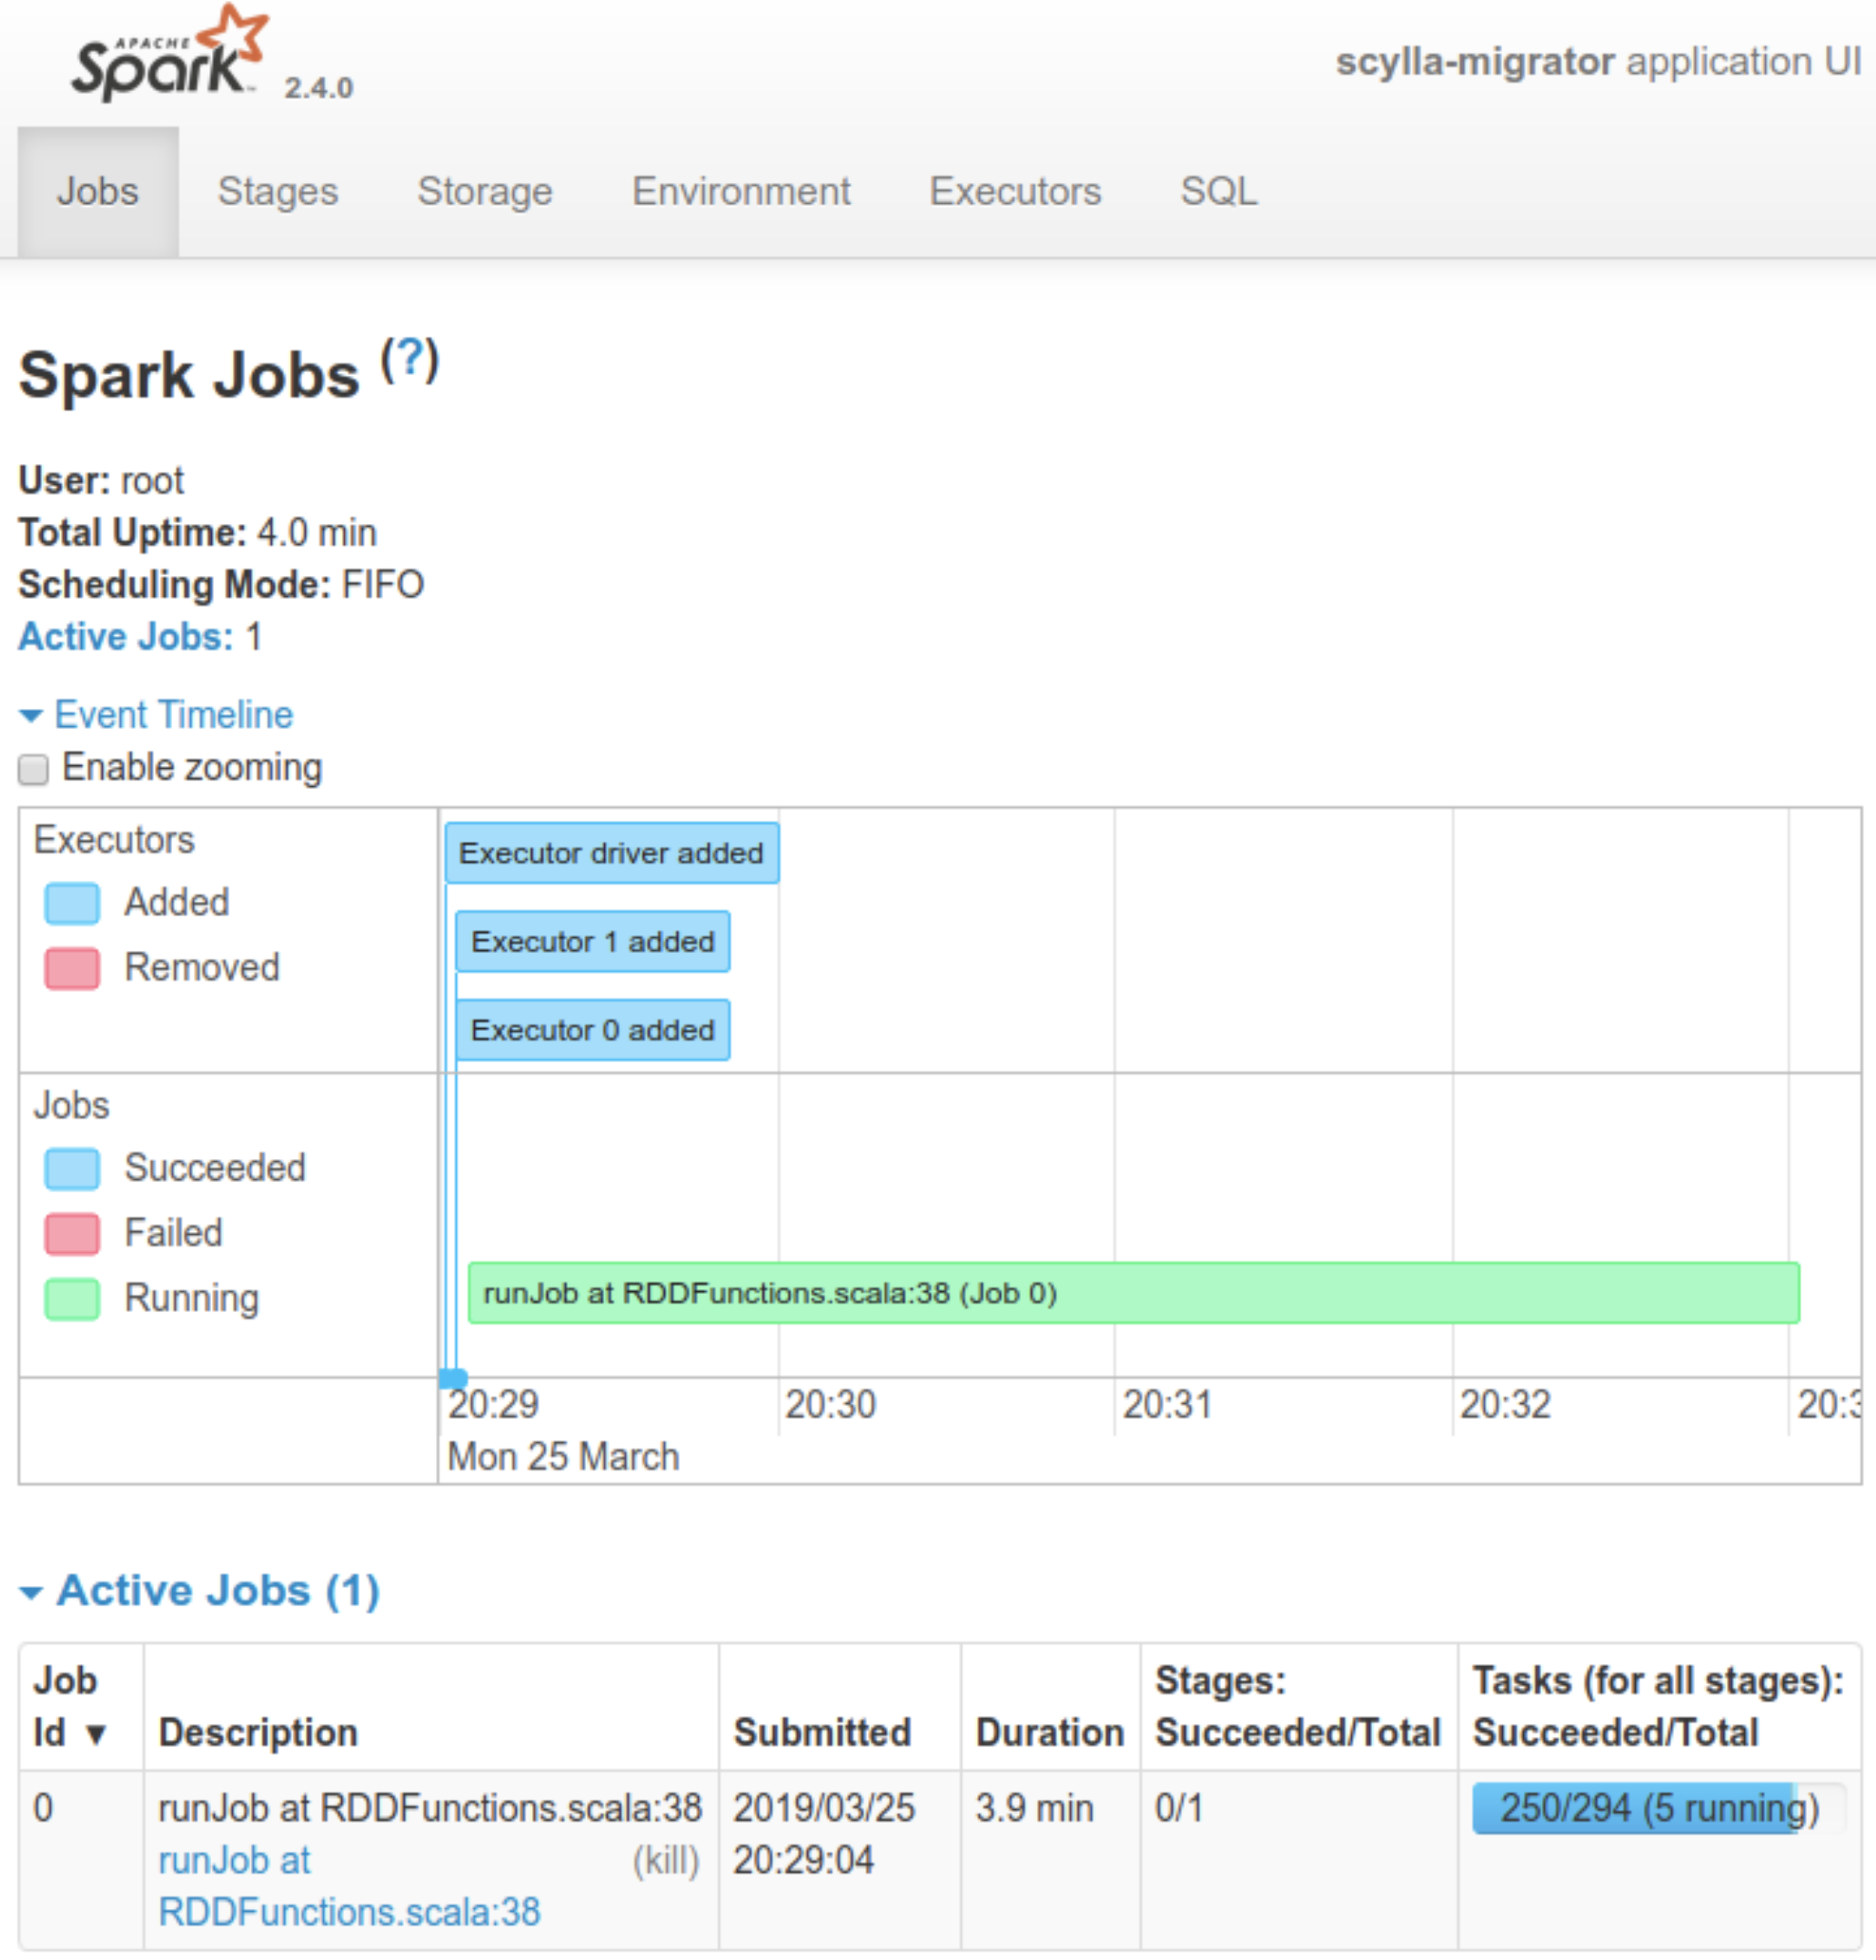
He also showed the Spark UI, where it indicates the job running until complete:
ScyllaDB or Cassandra Data Migration Conclusion
Dan concluded by recapping the various strategies:
- If your source is SQL, or CQL-incompatible NoSQL databases like MongoDB, use the COPY command method
- If you have control of the topology and can afford extra nodes, and particularly if you want to decommission the original cluster quickly, use Mirror Loader
- If you have access to the original SSTable files, use SSTableloader
- If you want fully-flexible streaming solution and can afford the extra load on the source, use the ScyllaDB Spark Loader
With that, Dan took questions from the audience, which you can listen to in full on the video:
If after watching you have your own questions, we invite you to ask them on our Slack Channel, or by dropping us a line directly.
